
Hey everyone
As the topic says I'm planning on going water cooling in my system. This is something I've been wanting to do forever but never could budget it in with an upgrade so I'm now going to do it in a mini upgrade. What got me sparked on this was I had to start looking for a new case as this one I have will not fit the likes of the new ATi cards. So while I'm waiting for the prices to drop I thought I'd do this as a side upgrade. It is more of a want than a need but it will also give me more room to O/C my system a bit more and allow me to hold out the GPU upgrade a bit more till the prices have dropped.
This is what I'm running:
Coolermaster 650watt PSU
Asus P7P55D-E
Intel i7 860
8GB DDR3
MSI 5850
What I am looking at getting and is currently available at my usual suppliers are the following, also note I would like it to run on my CPU and GPU:
Case: Coolermaster HAF X
Rad: XSPC RS360 Triple Fan Radiator
Res/Pump: X2O 750 Dual 5.25” Bay Reservoir Pump
CPU Block: RayStorm CPU WaterBlock (Intel)
Fittings: G1/4″ to 1/2″ ID, 3/4″ OD Compression Fitting
GPU block: Rasa GPU
Fans: Coolermaster SickleFlow 120 2000 RPM Blue LED
Flexible Tubing (1/2"ID, 3/4"OD) Clear (3.0m)
Coolant: Zalman G200 Coolant
I also see in one of the suggested watercooling bundles they put in this Silver Kill Coil for Watercooling Loops it is a pure anti-algae/antimicrobial thing is this still necessary if I go with the coolant above and not just De-mineralized water? I would have preferred a XSPC Razor GPU block but it would seem that there isn't one for the 5850.
Any thoughts or suggestions on the above components.
Also to note is I'm not in the states so if other components are suggested I'd need to see if I would be able to source it locally.
And as always I appreciate all the help and inputs, thanks in advance.
WaterCooling Project/Upgrade
WaterCooling Project/Upgrade
All that is necessary for evil to triumph is for good men to do nothing!

Re: WaterCooling Project/Upgrade
whats the sum total of all the parts you are getting for your water cooler?
-
Foil

- DBB Material Defender

- Posts: 4900
- Joined: Tue Nov 23, 2004 3:31 pm
- Location: Denver, Colorado, USA
- Contact:
Re: WaterCooling Project/Upgrade
Just a couple of quick questions:
1. Where are you mounting the radiator?
2. Do you have heatsink(s) to go along with that universal block for the GPU? [I've had great success using a HeatKiller block for my 4870x2, you might try this one.]
---------
From my experience venturing into watercooling (I built one a couple years back, and rebuilt/upgraded it last month), here are my little bits of advice:
1. Plan, plan, PLAN. That includes not just the loop(s) and components, but put some thought into cable management, aesthetics, etc.
2. I highly suggest using non-conductive stuff everywhere (thermal compounds, coolant, etc.). My first build sprung a slow leak on the cpu block (badly-tightened fitting, my fault) about a week after I built it. It leaked on the cpu and motherboard, so if I'd been using something conductive, I would've lost some stuff.
3. Enjoy it! Your first build will have quirks, it just happens; decide ahead of time to let it be enjoyable rather than stressful.
1. Where are you mounting the radiator?
2. Do you have heatsink(s) to go along with that universal block for the GPU? [I've had great success using a HeatKiller block for my 4870x2, you might try this one.]
---------
From my experience venturing into watercooling (I built one a couple years back, and rebuilt/upgraded it last month), here are my little bits of advice:
1. Plan, plan, PLAN. That includes not just the loop(s) and components, but put some thought into cable management, aesthetics, etc.
2. I highly suggest using non-conductive stuff everywhere (thermal compounds, coolant, etc.). My first build sprung a slow leak on the cpu block (badly-tightened fitting, my fault) about a week after I built it. It leaked on the cpu and motherboard, so if I'd been using something conductive, I would've lost some stuff.
3. Enjoy it!
-
Krom

- DBB Database Master

- Posts: 16057
- Joined: Sun Nov 29, 1998 3:01 am
- Location: Camping the energy center. BTW, did you know you can have up to 100 characters in this location box?
- Contact:
Re: WaterCooling Project/Upgrade
Pure water is one of the best coolants around, however distilled or especially deionized waters are also rather corrosive which is why people put additives in them.
Silver coils are useful for keeping algae from growing in your loop, but the coil will eventually corrode and require replacement/cleaning (depending on how effective the anti-corrosion properties of the additive you use are).
IMO 1/2" ID, 3/4" OD diameter is overkill and will likely be somewhat of a pain to get around corners and bends, I ran my coolers on 1/4" ID, 3/8" OD and it worked perfectly without having any impact on performance but was much easier to work around tight spaces. With the amount of water these coolers hold some of the higher end pumps at full speed could recycle all the water in the entire loop in as little as a few seconds so it is better to think of the water as one solid component in a typical loop rather than a flowing liquid anyway.
One item that you might want to explore is doing as much of the water lines and joints as you can with sweat soldered flexible copper tubing instead of the compression fitted plastic. Sweat soldered copper is better for a couple reasons: Primarily because a proper sweat solder joint simply won't leak ever (and an improper joint will leak immediately which makes testing convenient), but also because the plastic tubing is more porous and will let water evaporate at a surprising rate (even more so with 3/4" OD tubing like that). Also copper tubing keeps light out which further helps prevent algae growth, and you won't have to worry about any dissimilar metals accelerating corrosion because it will be all copper. Just don't let the sound of sweat soldering with a torch scare you away; soldering joints with flexible copper tubing (especially down in the 1/4" ID size) is very quick and easy.
However if you are going to use the clear plastic tubing then compression fittings are definitely the way to go for convenience and for a secure hold. They will rip the water block (likely socket and all) off the motherboard before they would let go of the tubing most of the time. Also don't buy the tubing online, you can get coils of 50-100 feet of the stuff for less than $10 at most brick and mortar hardware stores and it is exactly the same stuff they sell online for upwards of $2-3/foot.


Re: WaterCooling Project/Upgrade
Let me open this by saying that I've never done a water cooling project myself. I've worked (a decent bit) with fish tanks and have put some thoughts into a water cooling project.... so bear this all with a grain of salt. Also, what I'm suggesting will require you to be relatively handy...
1. IMO the smart way to do water cooling is with a remote radiator that's placed somewhere (ideally an attic that doesn't get too hot) where it can be ugly, make noise, and take up space without anyone caring.
Because of that, I'd personally lean toward using commercial products that aren't necessarily for "water cooling" as much as possible. Is the radiator reasonably priced? I'm sure that you can get big radiators for cheap if you look into used automotive or HVAC/refrigeration products. Same thing goes for the circulation pump. If you look at commercial products in the automotive/HVAC/aquarium sector, you will probably get the same reliability at a better price because you're not buying the specialize product or the fancy aesthetics (if it's in your attic, who cares?). Also, I'd personally make my own reservoir for similar reasons.
2. As Krom said, rigid, soldered joints will be more reliable than fittings. In the aquarium world, people use PVC a lot... if you cement your PVC joints properly (prime both parts, apply cement to both parts, make sure you fully insert), they are the same as sweat soldered copper joints - if they're bad they'll leak right away and then never fail.
Since I'm suggesting that you do a (longer) run to a remote radiator, and with rigid tubing: larger diameter tubing will have less effect on your flow rate. Using as few bends as possible, and 45's instead of 90's will again maximize flow rate. The way I'd do it: run small diameter rigid sweat soldered copper as much as possible inside your CPU case. Run flex hose (maybe even something like the stainless braid over nylon stuff that you can get for your faucet) between the port on your computer chassis and a port on your wall. At the wall, possibly step your tube size up, and run rigid tube (copper or PVC) to your radiator/circulation pump/reservoir setup.
3. Try to build a convection loop into your setup, in case the pump fails.
Basically, have your water flow through your case from the bottom up, and through your radiator from the top down. Having the radiator above the computer (hence the attic suggestion) will help with this, too. If you're going to radiate below the case (in your basement or some such), insulating your long tube run will help, but possibly not enough.
4. Pick your fans for reliability and airflow only.
If all the fans are in a remote location, it won't matter what they look like or how loud they are.
5. I agree on the non-conductive coolant, and make a habit of checking your reservoir. Maybe even build some kind of warning system if it gets low.
Arch Linux x86-64, Openbox
"We'll just set a new course for that empty region over there, near that blackish, holeish thing. " Zapp Brannigan
"We'll just set a new course for that empty region over there, near that blackish, holeish thing. " Zapp Brannigan
-
Krom
- DBB Database Master
- Posts: 16057
- Joined: Sun Nov 29, 1998 3:01 am
- Location: Camping the energy center. BTW, did you know you can have up to 100 characters in this location box?
- Contact:
Re: WaterCooling Project/Upgrade
Just a note about the radiator, I have used an 360x120x40MM radiator pretty much identical to the one you are looking at and one of its claims was that it had 10,000 BTU cooling capacity. At the moment I'm using a traditional heat sink air cooler (heat pipe tower) that is quite large and brags that it has the capacity to cool up to 200 watts. One day I was curious and decided to see what happens if I converted the two figures: I assumed that the 10,000 BTU rating on the radiator is per hour, so if I convert that into watts it comes out to roughly 2930 watts. (The 200 watt heat pipe tower comes out to only 682 BTU/hour.)
Once when I was cleaning my radiator I circulated a couple gallon bucket full of boiling water and solvent through it. When I was done beating the tar out of the radiator I fired up the fans just for the hell of it. The fans I was using were my middle of the road set of 100 CFM fans, the total combined airflow through the radiator can be felt easily from 10-15 feet away but they aren't particularly noisy (the 200 CFM fans on the other hand are almost deafening). The intake air was about 68-70 degrees, but the exhaust air was as hot as a blow drier. It warmed up my room and made that bucket of water cold in only a couple minutes. So basically these radiators are absurdly powerful, miles into the overkill territory, and could easily cool two entire PCs even with relatively tame 30-50 CFM silent fans on them.
I'd say it isn't really necessary to transport the heat all the way to the attic or the basement, just getting it out of the PC case is usually good enough. However should you do something like that, the basement is actually preferable in most cases. The reason is because the temperature in the basement is generally more stable and usually only slightly cooler than the rest of the house, making it unlikely to dip or rise into the danger zones. A hot attic won't help your cooling any, but a cold attic can be very dangerous because of the performance of these radiators. My cousin once stuck his cheap aluminum radiator out the window on a cool fall day (40-45 degrees) to get a little more kick out of it, it nearly fried his system from condensate dripping off his water blocks after about half an hour.
However regardless of the basement or the attic, such a run will likely require a more powerful pump in order to reach the distance. If you are aiming for the attic make sure you check the specs on the pump, the relevant item is the "head" which is the distance above the pump that it can push water. And note that the higher you push water, the slower it will go till it reaches the "head" which is were the flow stops entirely.
Also I would tend to shy away from PVC in favor of the copper tubing because the copper is flexible and allows you to bend it around corners and mold it into shapes without using joints and elbows.
-
Foil
- DBB Material Defender
- Posts: 4900
- Joined: Tue Nov 23, 2004 3:31 pm
- Location: Denver, Colorado, USA
- Contact:
Re: WaterCooling Project/Upgrade
I strongly considered running my loop to a remote radiator, but settled on installing on the outside of my case, so I could move it easily within my house, and occasionally take it to a friend's place nearby.
One more thing to consider, if you decide on installing the rad on the top of your case: Pets. In my recent rebuild I put the rad on the top of my new case with the fan underneath blowing upward/out; anyway, one of my cats decided to sit on top of it (it's a nice warm spot after all), blocking nearly all the airflow, and sending the temps skyrocketing before I caught on. I ended up putting another fan on top, which not only deterred DeeDee, it helped a bit with temps.
One more thing to consider, if you decide on installing the rad on the top of your case: Pets. In my recent rebuild I put the rad on the top of my new case with the fan underneath blowing upward/out; anyway, one of my cats decided to sit on top of it (it's a nice warm spot after all), blocking nearly all the airflow, and sending the temps skyrocketing before I caught on. I ended up putting another fan on top, which not only deterred DeeDee, it helped a bit with temps.
Re: WaterCooling Project/Upgrade
@Flip
I am presuming you are talking about the cost? If so here is the prices converted from ZAR to USD. Keep in mind that PC components are pretty expensive compared to US prices over here as it has all the customs and what not added to it with the local shops markup as well. I've never bought direct from overseas because if I have to return items for some reason it will be a royal pain in the rear and taking shipping into account usually it is easier or better to buy local. Anyways...
Case: Coolermaster HAF X - $237
Rad: XSPC RS360 Triple Fan Radiator - $98
Res/Pump: X2O 750 Dual 5.25” Bay Reservoir Pump - $94
CPU Block: RayStorm CPU WaterBlock (Intel) - $92
Fittings: G1/4″ to 1/2″ ID, 3/4″ OD Compression Fitting - $6
GPU block: Rasa GPU - $77
Fans: Coolermaster SickleFlow 120 2000 RPM Blue LED - $8
Flexible Tubing (1/2"ID, 3/4"OD) Clear (3.0m) - $13
Coolant: Zalman G200 Coolant - $20
@Foil
At this point the GPU block is an uncertainty as you pointed out I didn't consider heatsinks which I guess will be for the memory, hence why I was actually looking at the Razor range of XSPC but alas no block for the 5850. The suggested block will sort that but I'll have to see if I can source that or something similar.
The plan was to top mount the rad in the HAF X and to go with the 3x 120mm fans bottom mounted to the rad and maybe adding a second 200mm fan to the top with the stock one for max airflow if it can run in that config. From what I've seen on a similar build is that they actually removed the 200mm fan and top mounted the 3x 120mm fans for a pull setup instead of a push.
@Krom
The price tag on the coil is about $15 so I guess using the above coolant which need to be mixed with water (will go with De-mineralized water) it is a good extra precaution to drop it in then. As for the copper piping and sweat soldering it I get the logic of it being better but my plan was to do this as a total inclosed build in the case and going that way will make this a pretty tight and none flexible setup and seeing as the reservoir is drive bay mounted topping it up will require flexible tubing. You could just add a bit of flexible tubing just for that purpose. The other option will be to go external then. I'll dig into this a bit more but I don't want to over commit me to a build I don't feel comfortable with and have doubts I'll be able to do.
As for the tubing and maybe even the fittings I'll go check what the local hardware stores prices are as even with the conversion from ZAR to USD that seems like a rip-off indeed.
All that is necessary for evil to triumph is for good men to do nothing!
-
Krom
- DBB Database Master
- Posts: 16057
- Joined: Sun Nov 29, 1998 3:01 am
- Location: Camping the energy center. BTW, did you know you can have up to 100 characters in this location box?
- Contact:
Re: WaterCooling Project/Upgrade
For topping it off with the drive bay mounted res a good way to do it is to install a fill port in the top of the case (just use a T off one of the lines). Having one will let you top off the cooler without even needing to open the case, definitely convenient.
Edit: also if you invest in a tube bender for the size of copper tubing you are aiming for, you can get some absurdly tight bends in it so routing it around the case shouldn't be difficult at all:
[youtube]W6usvOZ9yIw[/youtube]
Edit: also if you invest in a tube bender for the size of copper tubing you are aiming for, you can get some absurdly tight bends in it so routing it around the case shouldn't be difficult at all:
[youtube]W6usvOZ9yIw[/youtube]
Re: WaterCooling Project/Upgrade
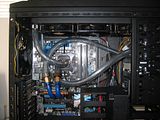
Okay so I’ve taken the plunge and gone with the components as listed. The build is done and I’m rather happy with the result as this is my first Water Cooling system. Some notes I’ll take from this is:
1) Yes the tubing that I got was a rather pain for tight corners but it worked out in the end (the problem was more availability of alternative components than anything else as local suppliers isn’t all that clued up with water cooling or parts for it)
2) The GPU was a royal pain in backside. I went with the RASA as it was cheaper than importing the other suggested block for a card that is due for a replacement within this year maybe. With the tubing I got (or lets rather say the only fittings and tubing the shop supplied for it) I ran into a problem of fitting it with heatsinks on the memory of the GFX and flexing the tube round the corner.
DIY solution below:
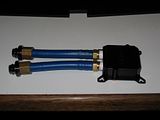
3) Had one leak during the leak test but fixed it (fittings on the GPU block)
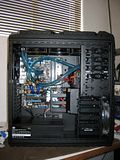
Overall here is the result:
CPU i7 860 Stock 2.8gHz OC’ed on Air 3.5gHz at 75 degrees on H2O 4gHz at 68 degrees
GPU ATi 5850 Stock 725/1000/1.08v OC’ed on Air 775/1100/1.08v at 68 degrees on H2O 890/1150/1.2v at 42 degrees
Those are the stable results so far a bit shy of my targets of 4.2gHz and 900/1200 but with some patience and more research I might get there.
As for the performance of the water cooling vs air cooling, I can’t believe I took this long to switch over.

1) Yes the tubing that I got was a rather pain for tight corners but it worked out in the end (the problem was more availability of alternative components than anything else as local suppliers isn’t all that clued up with water cooling or parts for it)
2) The GPU was a royal pain in backside. I went with the RASA as it was cheaper than importing the other suggested block for a card that is due for a replacement within this year maybe. With the tubing I got (or lets rather say the only fittings and tubing the shop supplied for it) I ran into a problem of fitting it with heatsinks on the memory of the GFX and flexing the tube round the corner.
DIY solution below:


3) Had one leak during the leak test but fixed it (fittings on the GPU block)
Overall here is the result:
CPU i7 860 Stock 2.8gHz OC’ed on Air 3.5gHz at 75 degrees on H2O 4gHz at 68 degrees
GPU ATi 5850 Stock 725/1000/1.08v OC’ed on Air 775/1100/1.08v at 68 degrees on H2O 890/1150/1.2v at 42 degrees
Those are the stable results so far a bit shy of my targets of 4.2gHz and 900/1200 but with some patience and more research I might get there.
As for the performance of the water cooling vs air cooling, I can’t believe I took this long to switch over.


All that is necessary for evil to triumph is for good men to do nothing!
-
Foil
- DBB Material Defender
- Posts: 4900
- Joined: Tue Nov 23, 2004 3:31 pm
- Location: Denver, Colorado, USA
- Contact:
Re: WaterCooling Project/Upgrade
Nice work! 
Now I gotta take some pics of my recent rebuild...
Now I gotta take some pics of my recent rebuild...
-
Krom
- DBB Database Master
- Posts: 16057
- Joined: Sun Nov 29, 1998 3:01 am
- Location: Camping the energy center. BTW, did you know you can have up to 100 characters in this location box?
- Contact:
Re: WaterCooling Project/Upgrade
Very nice! The performance with a decent size radiator really does destroy pretty much every air cooler out there.


Re: WaterCooling Project/Upgrade
EPIC!!!
And blood is thicker than water, so water was a good choice.
And blood is thicker than water, so water was a good choice.
❉⊱•═•⊰❉⊱•═•⊰❉⊱•═•⊰❉❉⊱•═•⊰❉⊱•═•⊰❉⊱•═•⊰❉❉⊱•═•⊰❉⊱•═•⊰❉⊱•═•⊰❉
-⎽__⎽-⎻⎺⎺⎻-⎽__⎽--⎻⎺⎺⎻-★ ·:*¨༺꧁༺ ༻꧂༻¨*:·.★-⎽__⎽-⎻⎺⎺⎻-⎽__⎽--⎻⎺⎺⎻-
❉⊱•═•⊰❉⊱•═•⊰❉⊱•═•⊰❉❉⊱•═•⊰❉⊱•═•⊰❉⊱•═•⊰❉❉⊱•═•⊰❉⊱•═•⊰❉⊱•═•⊰❉
-⎽__⎽-⎻⎺⎺⎻-⎽__⎽--⎻⎺⎺⎻-★ ·:*¨༺꧁༺
❉⊱•═•⊰❉⊱•═•⊰❉⊱•═•⊰❉❉⊱•═•⊰❉⊱•═•⊰❉⊱•═•⊰❉❉⊱•═•⊰❉⊱•═•⊰❉⊱•═•⊰❉